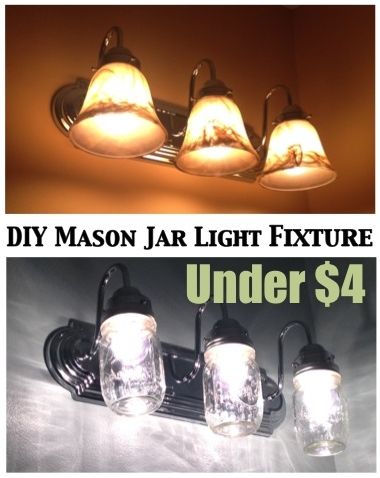
 I can't wait another minute to show you my new bathroom light. To say I am excited would be a vast understatement.
I told you last week how I was planning a challenge to myself to redo the powder room for $100. Well...my husband is out of town and my kids spent the weekend at the beach with the grandparents and so...I had 36 hours to transform this teeny tiny space and I have made some major headway! I'm not ready to make the big reveal yet, but I can't wait any longer to show you my mason jar light. I made this baby for $3.87...and that my friends, is how you keep a $100 budget!
We had this this hideous brown tri-globe light fixture and I just about hated it as much as I hated the yellow paint. But a whole new light fixture wasn't in the plans on my shoestring budget. Since I have been wanting a mason jar light I thought the bathroom would be the perfect spot for it.
I bought three small mason jars for $1.29 each at the craft store. The mouth of the jars didn't fit into the existing fixture so I had to find another way to attach them to the fixture we already had.
I took the two pieces of the canning lid apart and using a nail and hammer punched a circle of tiny holes on the round flat piece. I made the holes as close together as possible - making either a circle or an 'x' - but it wasn't enough to actually cut the metal.
But, if when I turned the canning lid over, I could punch holes in between what I had already punched allow the metal to break down easily.
Once I could get the pliers in there, I started slowly curling the metal back. You want to do this slowly because you don't want to make the hole too big. It needs to fit very snugly around the part of the fixture where the light bulb screws in.
I would peel some back and then try to fit it and then repeat and repeat until finally I would wiggle it on. When you put it on the fixture, be sure you put the top with the threads on first, then the canning lid with the hole, then the light bulb and finally screw the jar into the top.
We'll be bringing you lots more budget-friendly bathroom upgrades over the next few days and check back soon for the big reveal.
Update: I have had a few people ask about hwat keeps the jar from slipping off...the hole in the canning lid must be very snug around the bulb socket. That is what it keeps it all in place. If it does happen to slip - I have never had this - the light bulb acts as a backup to prevent the jar from falling because the hole is too small to fit over the bulb.
As always, thanks for stopping by 2IY! If you like what you see, we'd really like your pins.
Posted by: Melissa


That's really awesome! I love it! But will it not slip off eventually? I'd be so paranoid that it would fall due to the weight! (May try it anyway!)
ReplyDeleteHi DesignedbyBH! I actually was concerned about that too, but the diameter of the actual light bulb won't allow it to fall. The hole in the mason jar lid is too small. :)
DeleteHow does the heat from the bulb escape?
ReplyDeleteHi there,
DeleteIf you drill small holes around the center hole in the lid, the heat can escape that way. I did not do this for this light because it is in the powder room and the light is only on for a few minutes at a time. If this were in any other room - even a master bath - where the light would be on for extended periods of time, I would definitely recommend drilling heat holes to allow the heat to escape.
What a neat way to use some mason jars! Thanks for linking up!
ReplyDelete