This is a Sponsored post written by me on behalf of FrogTape. All opinions are 100% mine.
The mini makeover on my pack patio took another step forward this week. I painted a rug. Yes, I painted a rug. With the help of FrogTape® Shape Tape™ I took a plain ol' gray rug and added a little interest.
This project has been on my to do list for months. I wanted an outdoor rug for the sitting area in front of our patio fireplace. I didn't want to spend much money on a rug that would get rained on and be subject to hours of direct sunlight. I spent less than $18 on this 8x10' indoor/outdoor rug. To 'fancy' it up I added a white chevron border to the edges.
After being stalled for a few weeks, my laundry room makeover is finally nearing completion. The biggest project - and what had me at a standstill - was the cabinet. I purchased the old kitchen cabinet at a thrift store for just $15 several weeks ago.
I cleaned it up and peeled off as much of the nasty shelving paper as possible.
Last week's Link It or Lump It Link Party was stocked full of amazing projects. Since I'm a sucker for paint and painted furniture...and since I majorly have the itch to paint something but this weather is holding me back...I thought I'd round up a few of my favorite paint projects from the link party. I'm telling you these seven are some amazing makeovers with paint!
A
few months back I was driving down the road and I see this guy putting a
bunch of 'stuff' out by the curb with a big sign that said 'FREE!' The
luck!
I quickly pulled over and snagged this wood chair. The chair - just as it was when I threw it in my trunk - sat on my front porch all winter. that is until I took some spray paint and vinyl to it! To read the full post including seeing the 'after' head over to my sister site Silhouette School.
Last week I shared a furniture makeover project in which I converted an old dresser drawer into a raised storage box. The dresser was originally a solid wood stained piece with a poly finish. It may have been someone else's cup of tea, but it wasn't mine and so I painted it.
If you've been following Two It Yourself for any length of time you know I prefer chalk paint when painting furniture. I typically mix up a batch of DIY Chalk Paint, but for this project I was given the opportunity to test out Websters Chalk Paint Power. This was my first experience with Websters and I have to say I am definitely impressed.
Oh boy I am so excited to share this one with you...it turned out way better than I could have anticipated and had I known what the end result would look like I wouldn't have dragged my feet on this project for so long. It was literally months in the making...but really it took me all of about 2 (kid-free) hours to complete.
You might remember a few months ago when we had our master bathroom expanded so we could replace our tiny vanity with a double... No? Okay here's a refresher. Part of that renovation included combining our two reach and grab closets into one 'large' closet (and I do use that world loosely').
Let me start off by saying...I ain't no furniture painting expert. I'm just a girl, a SAHM, a wife, and DIYer who can't sit still so I started painting furniture. And then I started selling my painted furniture...and with each piece I paint, I learn more and more about painting furniture.
One of the biggest quandaries I had was about finishes and top coats. People always say 'poly' and my question is always 'poly what??' I think most people assume polyurethane, but there is a time and place for polycrylic, too!
I have found they are both essential in painting furniture - sometimes on the same piece. It was
recently when I was selecting my finishes for a piece with a stained top and a painted base that I realized sometimes the two must have a play date.
And so since I think I have finally wrapped my head around many of the pros and cons of both, I thought I would share what I have learned and that way others may have an easier time deciding the answer to "Polyurethane vs Polycryclic?"
I'm no pro, but I have painted and sold enough refinished furniture to have learned a thing or two about what will sell and what will sit. So here goes...
Be Picky with your Pieces: Pick pieces of furniture to refinish that are versatile. Not everyone has room in an entryway for a table, but if you refinish a piece that could be used as an entryway table or a sofa table you double your chances of selling it. The same thing goes for a buffet which could be also be used as an entryway table in one home or a TV console in another.
Accent Pieces Rule: Certain pieces of furniture are going to be tougher to sell than others. A dresser, for example, is a piece that many people already have because it's an essential piece of furniture. It will be tougher to sell a stand alone dresser - especially one that has been painted and doesn't "go" with their pre-existing bedroom decor. But accent pieces are pieces that add character, charm, color, and storage to a home's decor. They're non-essentials which means someone will have to fall in love with it to buy it - but since it's something they won't already have, they're not actually faced with replacing one piece for another.
A few weeks ago we shared with you all the details on Stephanie's $35 kitchen table makeover. It went from drab to fab with the help of a stained top and a white painted legs. Inspired by this $800 version, Steph's $35 table really was fabulous - if only you could sit at it.
Thankfully, she found a set of four matching chairs on the cheap at an area thrift store.
My latest furniture flip was a look I've been wanting to try for a few months - a stained top and a painted white base. But before I could get any stain or paint on this piece I had some reconfiguring to do.
I bought the TV console through a local Facebook group where people post things for sale. The woman originally asked $60 for it - but it sat and sat and sat. I took a stab and offered her $30. She took the bait and I took home this heavy solid wood tv stand with the intention of converting it into an accent piece that could be used in an entryway, living room or even a bedroom. She was in near perfect condition with no scratches, dents, or dings.
The first thing I did to start converting this piece was take off the back heavy cardboard piece that had cut outs for easy wire access. I also removed the sliding drawer/shelf and converted it into a stable shelf. The sliding shelf just screamed tv console.
Not gonna lie...I have been dying to share my latest furniture flip with you. I typically like to keep my projects in the works as a big surprise, but this one I couldn't keep to myself. If you following 2IY on Instagram, you know just how long I've been working on turning this thrifted dresser into a tv stand...or is it a buffet or is it an entryway table? The great thing about this piece is it's sooooo versatile it can be used in almost any room in the house. My house.
I am just gonna say up front I love this piece. I love the finish. I love the color. I love the uniqueness. I love that it's functional and stylish at the same time. I love it. I love it so much that even though I bought it to flip and sell I just simply can't let it go. So it's found a new home in my sunroom.
I bought this solid wood dresser at my favorite thrift store nearly a month ago. When I grabbed the tag to claim it I didn't even realize that the $45 price table included a huge solid mirror in nearly perfect condition, too! I mean really? They sell mirrors just like that at PB for $299.
Well, here we are more than half way through October and my ReSTOREd Seed Money Challenge is going strong. I'm currently working on my biggest piece of painted furniture yet. I'm hoping to get it up for sale by the end of this week - that is if I can part with it. It's a beauty, if I do say so.
So far I've sold four pieces - well, technically five you if count the set of matching nightstands as two. These babies really plumped up my Seed Money Challenge Fund.
I found them on a local Facebook page where individuals sell stuff. They came complete with yard sale stickers, because they clearly hadn't sold at $10 a piece. The seller was still asking $20 for the set, but I haggled her down to $15 and she was happy to just get rid of them.
If this table looks familiar, there's a good reason why. She's been on the blog before looking quite a bit different. I originally painted this 1960's vintage table from my local thrift store blue with a white drawer. She came out nice, but honestly I was never thrilled with her.
Well now...I'm in LOVE!
I went at her with Fiesta Red (which I made into DIY chalk paint) and on the re-paint I skipped the two tone going for solid red. I liked her well enough after I was finished with the red, but she just didn't seem totally authentic...this is a vintage piece and I wanted her to look it. She needed some personality. Some depth.
Happy Saturday, everyone! Today it truly is a happy Saturday at Two It Yourself. We're so thrilled to welcome our first guest blogger, Cara from the Craft Dictator. Let's give Cara a big warm 2IY welcome.
***
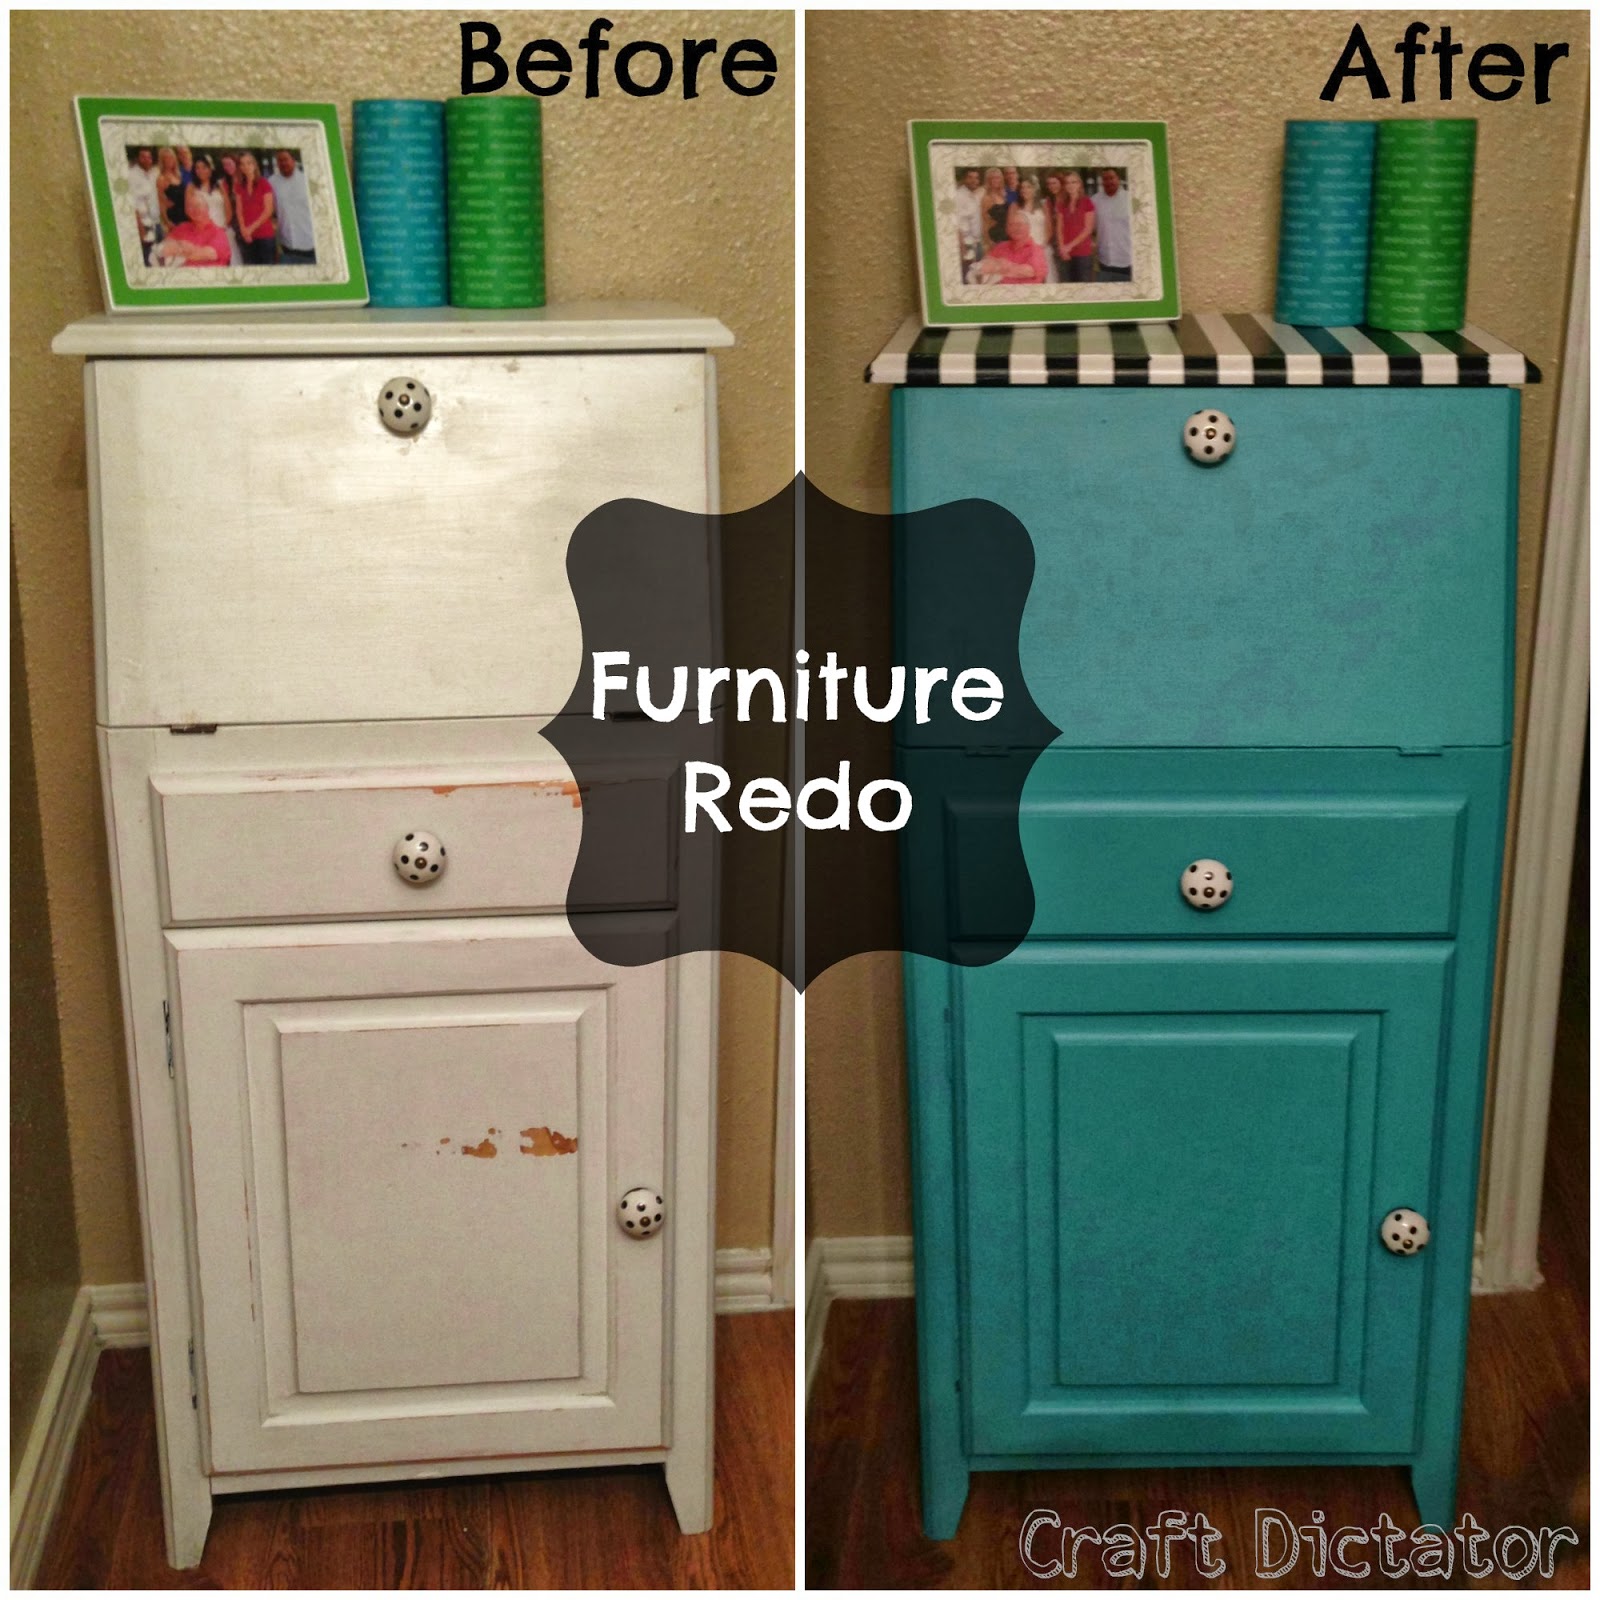
Today I'm going to talk about a piece of furniture I recently redid! I got this white piece of furniture from my mom a couple of years ago. It has lived in a bathroom, a kitchen, and a living room. Currently it is in my hallway. It is a very versitile piece of furniture that is great for storage, but we never really painted it. It was kind of painted white but it wasn't painted well. Then I got polka dot knobs on it about a year ago but never repainted it! For some reason last weekend I decided this was going to be the weekend this piece got painted! This is what it looked like before I started.
So last week I made a sweep through my favorite furniture thrift store and took home two pieces. One was this little vintage table. It immediately caught my eye as soon as I walked into the vintage room. The tag said 1960's vintage baby blue table. As I sanded her down it was obvious this table has not only been well loved, but also painted a few times.
Last week on the blog I showed off my newly refinished/repainted nightstand and got some great feedback from readers on it. One of the biggest compliments was from a reader who asked if the headboard in the photo was purchased or made. I'll give you one guess...
That got me looking at the photo, which at first glance doesn't look like much other than the nightstand. But actually when I look closer I realize just how much blood, sweat and tears love I have poured into our master bedroom since I started transforming it in the spring. In just this one photo I spy FIVE DIY projects that I have featured on the blog...can you see them?
Okay, okay I'll give you a few hints (and all the links to the tutorials)...
Let's start with the nightstand because it's the most obvious. It was painted two-tone to match the walls and trim and new hardware was added.
Well, here's my first piece that's part of my ReSTOREd Series - The Seed Money Challenge. If you're wondering what the frickety frack I'm talking about - click here and you'll get all the deets on my latest challenge. On the second thought - check that out in a second - you don't want to miss the goods on his piece!
I picked up this piece a few days ago from the thrift store and she was looking a little sad to say the least. I knew I wanted to paint her red - mostly because if she didn't sell, then at least she would match the decor in my house.
I started by taking off all the hardware it was kind of dated. I'm being too nice. It was downright ugly and old.
Hey guys - Melissa here. So I have some big news... basically I'm issuing another challenge to myself. Apparently, I like to challenge myself...perhaps you remember my crazy $100 bathroom makeover challenge? Did we get it done or what? You betcha and we came in under $85 for new lighting, paint, beadboard, trim, a window treatment and storage.
So now I'm giving myself another challenge. This one was inspired by the nightstand I recently repainted and rebeautified (is that a word?). I'm thinking this challenge is going to be a little tougher than than first, but I think I'm up for it. I hope you'll follow along since I'll be blogging all about my challenge in a new series launching NOW on Two It Yourself.
I'm going to take the money we made at our recent yard sale and use it as "seed money." Here's the challenge: more than triple the starter money by the end of the year. Okay so here's the deets. We made about $140 at the yard sale. My plan - which is already partially in motion - is to use that money to turn thrifted or unwanted pieces of furniture into a profit by refinishing and/or repainting them and reselling them.
Since I am basically giving myself three months to turn $140 into more than $400 I have to get moving (and sanding, priming, painting and selling.) Lucky for me, I've already purchased my first three pieces. One is a small cabinet piece that's so versatile it could be used in an entryway, as a TV stand, a small dresser, or even a baby changing table. Can you see the potential? I know it's tough when you're this...dated? Okay ugly, we'll go with ugly.
But she's already looking better right? And wait til you see the new hardware! She's gonna be awesome!
The other pieces were a great score - a set of matching nightstands or side tables. Here's a little sneak peek. These babies will be up for sale soon...looking more beautiful than ever! Hopefully they sell fast because the hubs isn't liking that I'm taking over the garage with all this "stuff." (Ahem, perhaps you shouldn't have thrown out the seed money idea, honey!)
The new series will be called ReSTORED...get it I'm restoring them and then basically re-STORE-ing them. Okay, maybe I'm over-thinking the name and trying to be too cutesy, but you feel me, right?! Great. Now I'm off to work....
Thanks for stopping by 2IY! If you like what you see, we'd love for you to pin it!
Recently our mom and her siblings sold our late grandparents' beach house. Of course, first came the challenge of emptying the place which had a lot of mis-matched, antique, and vintage furniture. All of the kids and many of the grandkids - including both of us - took a few things which made for some really awesome refinishing and repurposing projects like my tool box to herb garden and nightstand to entry table. Stephanie scored this vintage two-tiered drum table.
Let's be honest, it's not much to look at. In fact, even the bargain price at the estate sale didn't attract a buyer...but their loss was Steph's gain. She took the table apart and gave it a fresh coat of paint - spray paint, to be exact!


